You notice it the way you notice a gray hair in the mirror. Not all at once, but in a slow, creeping realization. One morning, while waiting for the kettle to boil, you glance down and see it: that dingy, dark line between your tiles. The grout. It’s not dirty exactly—at least, not in the way a single spill or footprint is dirty. It’s tired. Stained. Etched with years of coffee drips, muddy shoes, and the quiet procession of daily life.
At first you tell yourself it’s just the light. Then you kneel down, rub it with a thumb, and realize the truth. No amount of casual mopping has touched it. The tiles still shine, but the veins between them look like the floor’s been chain-smoking behind your back.
And that’s when the dread begins: the mental slideshow of contractors, jackhammers, dust tarps, and eye-watering estimates. You picture the entire floor being ripped out, the echo of tiles shattering in the dumpster, the week of walking on plywood. You open a browser tab and type, “how to clean tile grout,” bracing yourself for a parade of harsh chemicals, conflicting advice, and before-and-after photos that look a little too good to be true.
But here’s the reassuring, deeply ordinary truth: grout is both more stubborn and more forgiving than we think. You almost never need to rip your floors out. There’s a simple, methodical way to coax grout back to life—one that smells more like a rainy afternoon and less like a chemical factory, and that doesn’t involve a demolition crew.
The Day You Finally Look Down
Most of us live above our floors instead of with them. We notice the counters, the walls, the windows. The floor is just there, carrying everything: meals, arguments, dance parties, the slow padding of bare feet in the dark. Tile, especially, gives this illusion of permanence and perfection—as though it were installed to last forever and remain unchanged.
But grout is different. It’s porous, a pale mineral sponge squeezed between neatly cut slabs of ceramic or stone. Over time, it drinks in what the mop leaves behind: fine dust, pigments from spilled tea, a winter’s worth of salt crystals, the oils from our skin. Each bit invisible on its own, but together they dim the lightness of that once-cream line into a murky gray or brown.
One day, perhaps in the sharp morning sun or under the cold glow of a phone’s flashlight, you see your grout for what it is: not an abstract design element, but a map. Every smudge is a faint echo of something that actually happened in your home. The dog shaking off after a muddy walk. The pasta water that boiled over. The houseplant that fell in slow-motion, soil scattering like confetti.
Something in you bristles. You don’t want to replace the map—you just want it to be legible again. Clean, but not sterile. Lived-in, but not neglected. And somewhere between a scrub brush and a sledgehammer, there has to be a better way.
The Myth of the “Hopeless” Grout Line
Walk into any big-box home store and you’ll quickly absorb an unspoken message: grout is disposable. A finish to be covered, replaced, sacrificed when its cleanliness no longer matches the ad photos taped up in the tile aisle. Stories spread quickly—someone’s cousin spent a fortune having their tile pried up because “nothing would get the grout clean.”
It makes sense why this myth sticks. Grout is fiddly and low to the ground, a pain to reach, and often attacked with the wrong weapons: sloshed bleach, harsh acids, frantic scrubbing that damages more than it restores. When these quick-fix tactics fail, it’s tempting to throw up your hands and call a contractor.
But grout is not a lost cause. Under the stains, its structure is still there—tiny mineral crystals holding tight to one another. Most of what we call “permanent dirt” is actually an odd mix of soaps, oils, and pigment lodged near the surface.
The trick, as unglamorous as it sounds, isn’t a miracle potion or a viral hack. It’s a process: gentle chemistry, small-scale tools, and a shift in how you think about cleaning. Less like punishment and more like restoration. Think: tending an old wooden table, not stripping paint off a fence.
Once you see that, the whole idea of ripping out floors starts to feel a bit like throwing away jeans because of a grass stain. There’s so much life left in them—you just need the right approach.
The Easy Trick: Let the Cleaner Do the Heavy Lifting
The “trick” to easy grout cleaning is deceptively simple: stop scrubbing like you’re in a race, and start letting time and chemistry work for you. Most people make grout cleaning miserable by doing it backward—furious elbow grease with a cleaner that barely has time to touch the stain before it’s wiped away.
Imagine you’re steeping tea. You wouldn’t dip a tea bag into hot water for two seconds and expect a rich, full flavor. You let it sit. Grout works the same way. The magic isn’t in how hard you scrub, it’s in how long the right solution is given to soak and break down the grime.
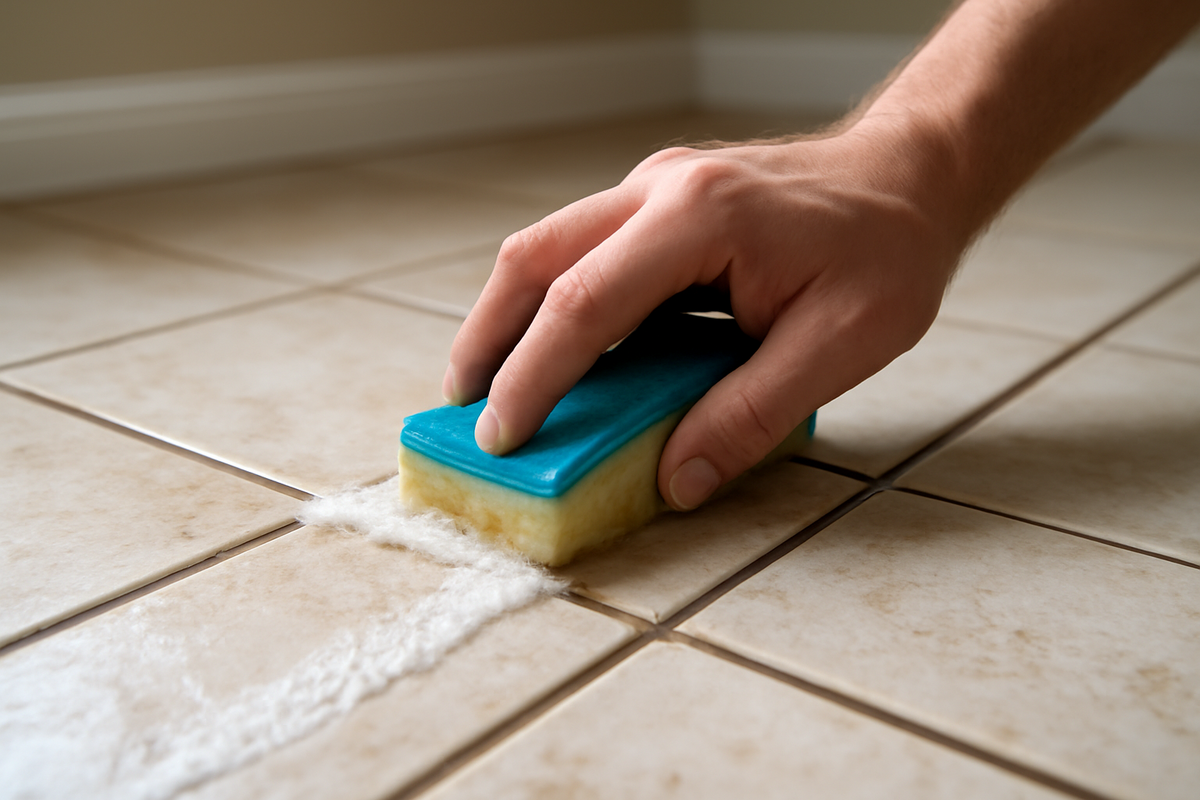
Here’s the gentle, low-drama method that saves floors, backs, and sanity:
- Start with a real clean slate. Vacuum or sweep thoroughly, then give the floor a light mop with warm, plain water and a tiny bit of mild soap. This removes loose dust and grit so your cleaner can focus on the stains, not the surface crumbs.
- Mix a targeted grout solution. For most grout, a combination of warm water, a bit of dish soap, and oxygen-based cleaner (the kind labeled as oxygen bleach or sodium percarbonate) is enough. This doesn’t smell harsh and is safer for both your lungs and your tiles than chlorine bleach.
- Apply and walk away. Pour or spray the solution along the grout lines until they’re well saturated, but not flooded. Then leave it. Ten, fifteen, even twenty minutes. In that quiet time, tiny bubbles and mild detergents are loosening the film that’s built up over years.
- Light scrubbing, small brush. When you come back, use a simple nylon brush—an old toothbrush works—to gently work along the lines. You’re not trying to sand the grout down, just lift away what’s already been softened.
- Rinse, don’t smear. Mop again with clean water, changing it often. Otherwise, you’re just redistributing grayish slurry across your floor.
This is the easy trick: time plus a calm, methodical rhythm. The cleaner does the heavy lifting while you wander off to make tea, sort a drawer, or watch a few minutes of a show. By the time you come back, the grout is practically ready to release its stains with minimal effort.
What This Looks Like in Real Life
Picture it on a late Saturday morning. You crack a window. The house is quiet except for the muffled scrape of the brush and the low burble of the kettle. The floor is sectioned off in your mind: four tiles at a time, no more. You saturate, wait, scrub, rinse. The lines that looked permanently tired blossom back toward their original shade, not in a snap, but in a steady, satisfying reveal.
There’s a particular pleasure in it, especially when you compare a cleaned section to what’s left. It’s like watching fog lift from a valley, one slow patch at a time. You don’t have to finish the whole kitchen in a day. You can do one zone this weekend, another next. The floor doesn’t mind. Grout responds more to consistency than heroics.
When to Go a Little Deeper (But Still Not Rip Out the Floor)
Some grout is more stubborn. Maybe it’s in a hallway that’s been trampled for ten winters, or in a shower where soap scum and minerals have built a tight little union beneath your feet. Even then, demolition is almost never the honest first step. What you need is a built-up approach, not a blow-it-up approach.
There are three escalating “depths” to consider—each still dramatically simpler than a full tear-out:
- Deep clean plus repetition. Stains often lighten in passes. The first round lifts the surface. The second, done another day, reaches deeper. It’s like washing a white T-shirt more than once after a big spill; the fibers keep letting go a little more each time.
- Steam cleaning. A small household steam cleaner, used with a brush attachment, can work wonders. The heat loosens oils and residue without dousing your grout in chemicals, and the steam’s pressure nudges buildup out of those tiny pores. You still wipe and rinse, but the heavy chemical lifting is replaced by gentle physics.
- Grout color sealer. For grout that’s genuinely discolored beyond what cleaning can fix—or for grout that has simply aged into a different shade—a colored sealer is like a fresh coat of paint and a raincoat rolled into one. You clean thoroughly, let it dry, then apply the sealer with a small brush or applicator bottle. It soaks in, evens out the color, and hardens into a protective layer that shrugs off new stains.
Even that last step, which sounds intense, is small and quiet compared with the chaos of ripping out tile. The work lives close to the floor, unhurried. You control the pace. Your house stays intact. Your budget stays on the sane side of the spectrum.
And at each stage, you’re still tending the floor you already have, not giving up on it.
A Quick Comparison: Effort vs. Outcome
Here’s how the different approaches tend to shake out in real life:
| Method | Time & Effort | Disruption to Home | Typical Outcome |
|---|---|---|---|
| Timed soak + gentle scrub | Low to moderate; done in small sections | Minimal; room still usable | Grout visibly lighter, lines look refreshed |
| Add steam cleaning | Moderate; more focused passes | Still low; short sessions | Deep stains lifted, grout near-original in many areas |
| Color sealing cleaned grout | Moderate; detailed application | Room off-limits while sealer cures | Even, like-new grout color; better stain resistance |
| Full tile and grout replacement | High; days of professional work | Major; noise, dust, no access to room | New floor, but at many times the cost of cleaning |
Seeing Your Floor as a Living Landscape
There’s a deeper shift that happens when you start treating grout with patience. The floor stops being a flat, unchanging backdrop and becomes a kind of landscape, with its own small weather patterns and seasons.
In the kitchen, where life is the messiest and most delicious, grout will always work harder. Near the stove, splatters will try to settle in. At the entryway, sand and salt will insist on being tracked inside. If you pause and look, you can almost see the footprints: ghostly reminders of past days walking through the same square tiles.
Cleaning grout with this slower, easier method is oddly similar to walking a familiar trail and finally noticing the details—the lichens along the path, the way moss thickens near the shade. As you kneel and work along each line, the room becomes more intimate. You notice tiny chips you’d never seen, a hairline crack that tells you where heavy furniture used to sit, a faint shimmer in the glaze of a tile when afternoon light leans in through the window.
It’s domestic, yes. But it’s also a kind of small, personal ecology: water, minerals, light, time. Every action changes the micro-landscape just a little. Scrubbing mercilessly is like erosion; thoughtful care is more like pruning. The floor doesn’t need a bulldozer—it needs a gardener.
Little Habits That Keep Grout from Giving Up
Once you’ve restored your grout, or even just lightened it significantly, a few small rituals help keep it looking like itself far longer:
- Catch spills early. When something dark or oily hits the tile, a quick wipe followed by a dab of water along the grout line stops it from sinking in and telling a decades-long story.
- Dust before you mop. Tiny grit plus wet mopping can form a thin, muddy film in your grout. A pass with a vacuum or broom first keeps your wash water cleaner.
- Use gentler cleaners more often. Harsh products promise miracles, but they can slowly etch grout or leave residues. Mild soaps and oxygen-based cleaners, used regularly, keep buildup from getting a foothold.
- Seal, then re-seal. Clear or colored sealers don’t last forever. Checking them every year or two and touching up as needed adds years to the life of your grout, much like waxing a car protects the paint.
None of this is dramatic. There are no viral “before and after” clips of someone simply mopping properly. But the reward is quieter and longer-lasting: a floor that wears its years gracefully, instead of all at once.
The Quiet Satisfaction of Not Starting Over
We live in a culture that loves fresh starts. New floors, new kitchens, new everything. There’s a thrill in imagining ripping out what feels tired and installing something immaculate and untouched. Yet, beneath that impulse lives a quieter, older satisfaction: keeping what you have and making it well again.
When you step back from a newly cleaned grout line—the same one you were convinced had “gone too far”—there’s a subtle sense of triumph. You didn’t outspend the problem. You didn’t summon a crew. You met the material on its own terms and coaxed it back.
Maybe, as you stand there in your socks, tea cooling on the counter, you feel a surge of affection for this floor that’s seen so much. It is not new. It has heard every argument, felt every spilled drink, supported every late-night pacing session while you worried about something that now seems distant. The grout remembering some of that is not a flaw. It’s context.
The easy trick—the timed soak, the patient brush, the refusal to panic and rip everything out—isn’t just about cleaning. It’s about changing your relationship with the things that hold your life, literally, together. You can be firm and kind at the same time. You can lift stains without erasing history.
In the end, the floor remains the same one you started with, only clearer. The room looks brighter, not because you installed something new, but because you revealed what was already there.
Frequently Asked Questions
Do I really not need bleach to clean my grout?
Most of the time, no. Oxygen-based cleaners and mild detergents, given enough time to soak, handle organic stains very well. Bleach can sometimes lighten grout but may damage it, irritate your lungs, and doesn’t always remove the root of the stain—just the color. Save bleach-based products for rare, specific needs, if at all.
How long should I let the cleaning solution sit on the grout?
Generally, 10–20 minutes is enough for most oxygen-based cleaners or mild detergents. If it dries out, lightly re-wet it. Avoid letting any cleaner sit for hours unattended, especially stronger products; always follow the instructions on the label and test a small area first.
Will this method work on colored grout too?
Yes, but test a hidden section first. Colored grout can be more sensitive to harsh cleaners, so stick to gentle, pH-neutral soaps and oxygen-based products. Avoid strong acids or heavy-duty “brighteners” which may strip color.
What if my grout is crumbling or cracked?
If the grout is physically damaged—cracking, missing in spots, or powdery—cleaning alone won’t fix that. In those areas, you may need to remove loose material and re-grout just the affected lines. This is still far less work and cost than replacing the entire floor and can often be done as a small, focused repair.
How often should I deep-clean my grout?
For busy kitchens or entryways, a deep clean every 6–12 months is usually enough, with lighter maintenance in between. Bathrooms and lower-traffic areas can often go longer. The key is to address spills and buildup early, so deep cleaning remains simple rather than overwhelming.
Do I need a professional steam cleaner?
Not necessarily. Many small, consumer-grade steam cleaners do an excellent job on grout when used slowly and carefully. If your grout is extremely stained or extensive (like in a large commercial space), a professional service might be worth considering—but for most homes, a modest machine and patience work well.
What’s the difference between a sealer and a color sealer?
A clear sealer protects grout without noticeably changing its appearance; it simply helps repel water and stains. A color sealer both protects and changes or evens the grout’s color, giving older grout a “like-new” look while shielding it from future staining. Both need proper cleaning and dry grout before application to work effectively.

Hello, I’m Mathew, and I write articles about useful Home Tricks: simple solutions, saving time and useful for every day.