The loaf on the counter looks like a small brick of winter—hard, frosty, and absolutely uninviting. You tap it with a fingernail and it actually makes a sound. This is the bread you lovingly bought from that tiny bakery two weeks ago, the one with the crackly crust and buttery crumb. You meant to finish it. Life, of course, had other plans, and into the freezer it went. Now it’s dinner time, you’re hungry, there’s no fresh bread in sight, and you don’t own a toaster. Turning on the oven for one lonely hunk of bread feels excessive. You sigh, ready to settle for something else.
But wait. Imagine this: in less time than it takes to scroll through your messages, that stiff, freezer-burned bread could be warm, fragrant, and softly yielding again—without an oven, without a toaster, and without turning your kitchen into a sauna. Just thirty seconds, a dash of water, and a pan. This is the kind of tiny kitchen magic that feels like cheating, the trick bakers use when they want yesterday’s bread to behave like it just came out of the oven. And once you’ve done it a few times, you’ll start freezing bread on purpose, just so you can revive it like this.
The Moment You Meet Frozen Bread
There’s a particular kind of disappointment that comes with forgotten bread. You smell it first when you open the freezer: that faint flour-dust scent, mingling awkwardly with frozen peas and ice crystals. You pull out the loaf or the leftover half-baguette and feel how utterly lifeless it is, like a prop from a winter scene. The crust is pallid, the crumb dull and compact. That once-supple interior—the soft, stretchy middle that soaked up soups and stews—has stiffened, dried, and tightened around itself.
Most people resign themselves at this point. Maybe you break off a chunk and let it sit on the counter, waiting for it to “thaw naturally,” only to discover it’s floppy but still stale-tasting. Or you’ve already tried the microwave trick: thirty seconds on high, and now it’s hot but weirdly rubbery, a texture that squeaks under your teeth. Not exactly comforting food.
This is where the quiet genius of a baker’s trick steps in. Professional bakers understand something that most home cooks never quite internalize: bread isn’t dead when it goes stale; it’s just forgetful. It has lost some of its moisture, some of its structure, some of its charm—but under the right conditions, it can remember. Your job is not to bully it with high heat or blast it into softness. Your job is to coax it. To give it warmth, water, and a little time—very little time, as it turns out.
The 30-Second Stove-Top Revival Trick
Here’s the promise: you can take a frozen slice or two of bread and turn them back into something tender, steamy, and very convincingly fresh in about thirty seconds. No oven. No toaster. Just a pan and a splash of water.
Picture this like a tiny, controlled steam room for your bread. Think of the pan as the floor, the lid as the ceiling, and the water as that gentle mist that melts stiffness away. Instead of blasting the bread with direct heat (which dries it out), you’re surrounding it with warmth and moisture—exactly what gluten and starch need to relax and bloom again.
To really understand how silky this method feels in real life, imagine the sound first: a soft hiss as water hits warm metal, the quick bloom of steam, the faint crackle of a crust waking up. Then imagine lifting the lid after half a minute and inhaling that suddenly-louder scent of wheat and yeast. The crust is no longer chalky and cold; it’s supple, maybe even slightly crisp at the edges. The bread bends, instead of snapping. You press a finger lightly into the side—springy. Alive again.
How to Do It: Step-by-Step in Real Time
Let’s walk through it as if we’re standing together in your kitchen, frozen bread in hand, pan on the stove, a little skeptical but curious.
Step 1: Start With a Nonstick or Heavy-Bottomed Pan
Grab a small skillet or frying pan—nonstick works beautifully, but a well-seasoned cast iron pan is even better. The main thing is that it has a lid or something that can serve as a lid. If you don’t have a perfect match, a larger lid or even a baking sheet that covers the pan will do.
Set the pan over low to medium-low heat. You’re not searing a steak; you’re coaxing warmth. Think of this as “gentle morning sun” heat, not “midday desert” heat.
Step 2: Prepare the Bread—Straight From the Freezer
Fish your bread out of the freezer—slices, chunks, or halves. No need to thaw in advance. In fact, this trick works best on bread that was frozen when it was still relatively fresh.
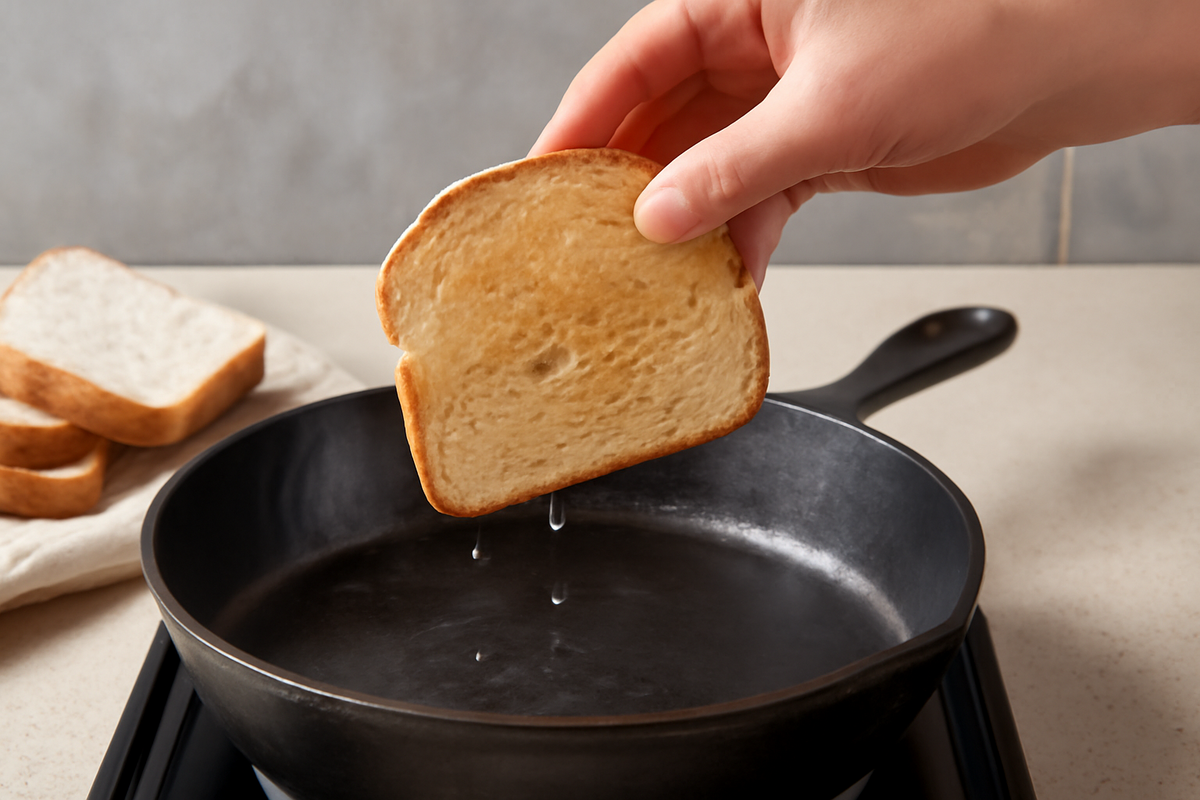
Now, this part matters: lightly moisten the surface of the bread. You can run your fingers under the tap and flick a few drops onto the crust, or quickly wave the crust side under running water and shake off the excess. You don’t want it drenched—just kissed with moisture. If it’s pre-sliced sandwich bread, a damp hand brushed over the surface is enough.
Step 3: Build a Quick Steam Chamber
Place the bread, cut side down if it’s a chunk or slice, flat in the pan. Let it meet the warmth for just a few seconds. You should hear the faintest whisper of contact, nothing aggressive.
Now add your steam. Drip about a teaspoon of water into the bare metal area of the pan, away from direct contact with the bread. It will hiss and quickly turn into steam. Immediately cover the pan with the lid. You’ve just trapped that fresh, hot mist around the bread, where it can work its way into the crust and crumb.
Step 4: Count to 30 (Seriously)
Set a mental timer—about thirty seconds. In that half minute, the steam is softening the exterior and slipping into the bread’s structure, while the gentle heat is waking up the starch molecules inside. If your bread is thicker or you started from a completely rock-hard frozen chunk, you can go up to 45–60 seconds, but resist the urge to overdo it.
At around the 20-second mark, you might notice the smell of “fresh bread” starting to reappear. That’s your sign things are going right. The crust may feel slightly softer at first, then regain a delicate firmness as it dries just enough when you open the lid.
Step 5: Check, Flip (If Needed), and Serve
Lift the lid and check the texture. Press gently on the bread. Is it soft in the center, with a little resilience? If it feels a bit cold in the middle, flip it over and give it another 10–15 seconds with the lid back on. Thinner slices usually don’t need flipping; thicker chunks often do.
When you’re satisfied, remove the bread from the pan and let it sit on a plate for a brief moment—just long enough for any surface dampness to evaporate. Then tear or slice into it. You should see a moist, steamy interior, not dry crumbs spraying everywhere.
Why This Works: A Tiny Bit of Kitchen Science
Underneath this very practical, very quick trick is a quiet dance of molecules. When bread goes stale, it’s not just “drying out”—it’s undergoing something called starch retrogradation. The starch molecules that were puffed up and jumbled when the bread came out of the oven slowly realign and tighten over time, pushing out moisture and turning the crumb firm and dull.
Freezing pauses this aging, but it doesn’t cure it. Once the bread comes back to room temperature the wrong way, the starch stays in its rigid form and the bread tastes cold and tired, even when it’s technically thawed.
What your pan-and-steam method does is briefly reverse that process. The heat gently warms the starch, loosening its tight structure, while the steam gives back a tiny bit of moisture, allowing the crumb to breathe and expand. Because you’re using very little time and water, you avoid turning the bread soggy. It’s the difference between a warm bath and a boiling soak; your bread needs a spa day, not a punishment.
Microwaves can heat fast, but they tend to over-activate the water molecules unevenly, which is why you get that odd rubbery chew. Ovens give great results, but they require preheating and a full production for what might be just one or two slices. The stovetop trick gives you oven-like revival results with microwave-level speed.
Adapting the Trick for Different Breads
Different types of bread respond slightly differently to this method, but the principle stays the same: gentle heat + a little moisture + short time.
| Bread Type | Water Amount | Time Range | Notes |
|---|---|---|---|
| Thin sandwich slices | Very light surface dampening | 20–30 seconds | Usually no flip needed |
| Hearty sourdough slices | A few droplets on crust | 30–45 seconds | Flip once for even warmth |
| Chunks of baguette | Quick pass under tap, shake off | 40–60 seconds | Start crust-side down |
| Burger buns or rolls | Damp palms pressed on cut faces | 25–35 seconds | Warm cut-side down for light toasting |
With softer breads like milk bread or brioche, go especially easy on the water and time. Their tender crumb responds very quickly, and you want to preserve that luxurious fluff. For very crusty artisan loaves, you can be a bit more generous with the moisture on the crust and give them closer to a full minute, checking halfway.
Little Rituals That Make It Feel Like Fresh Bread Again
Part of the joy of this trick is not just that you get edible bread; it’s that you reclaim the whole “fresh bread moment.” The small rituals matter.
While the bread is reviving in the pan, pull out your butter or olive oil. Let the butter sit for a minute to soften just slightly; cold butter on warm bread is a beautiful contrast, but rock-hard butter carving ruts through delicate crumb feels a bit harsh. Maybe crush a pinch of flaky salt between your fingers and leave it ready in a tiny heap on the corner of your plate.
When you open the lid and that soft cloud of wheat-scented steam rises up, pause. Lift the bread, feel its new weight, note how it flexes gently when you press it. Tear it instead of cutting, just once, to listen to the tender fibers stretch and separate. Spread butter or dip into oil while it’s still steaming faintly.
And if you’re reheating several slices for people you love, there’s something quietly generous about setting down a plate of “rescued” bread that no one would guess had been frozen. It’s the kind of invisible care that doesn’t require fanfare. You simply know how to bring things back to life.
Common Mistakes and Gentle Fixes
Like any good kitchen move, this trick has a few pitfalls—usually the result of impatience or overenthusiasm. Fortunately, they’re easy to correct.
Too Much Water
If you overdo the water and your bread surface comes out a bit damp or borderline soggy, give it a quick, lid-off rest in the same warm pan for another 10–15 seconds. The excess surface moisture will evaporate, and the crust will firm up just enough.
Too Much Heat
If the pan is too hot, the bottom of the bread can scorch before the interior has a chance to soften. If you smell browning before you smell bread, lift the bread out, lower the heat, and add a splash more water next time. The goal is slow, even warmth, not aggressive frying.
Too Much Time
Leaving the bread in for too long can make it oddly chewy, as the starch over-gelatinizes and then firms up as it cools. Aim short and adjust in small increments. It’s easier to add 10 seconds than undo over-softening.
This method rewards paying attention: the smell, the feel, the way the crust shifts from rigid to pliant. After a few tries, you’ll do it almost on instinct, the way you know when pasta is al dente just by lifting a strand with a fork.
Why You Might Start Freezing Bread on Purpose
Once you become fluent in this 30-second revival, your relationship with bread changes. Suddenly you’re free from the pressure of finishing a loaf in a day or two. That beautiful bakery sourdough? Slice half of it and freeze the slices flat. The last third of a baguette after dinner? Into the freezer, wrapped, instead of leaving it to go stale on the counter. Those delicate rolls you bought “just in case” guests stayed over? Freeze them guilt-free.
Instead of thinking of the freezer as where bread goes to suffer, you can think of it as a pause button. A way of stretching that one perfect loaf across a week of soups, eggs, and midnight snacks. And every time you revive a slice in your tiny stovetop steam chamber, you get another chance at a fresh-bread moment—no oven, no toaster, just a bit of water and a bit of care.
There’s a quiet satisfaction in that. In knowing that even something as simple as a piece of bread can be rescued, revived, and made generous again in half a minute. It’s kitchen alchemy, yes—but it’s also just paying attention. A reminder that so many things we write off as “done” are really just waiting for the right kind of warmth.
FAQ
Can I do this with completely stale bread, not just frozen?
Yes, but with a caveat. This trick works best on bread that was frozen while still fairly fresh. If your bread is days-old and truly stale, the steam-and-pan method will improve the texture and make it softer and more pleasant, but it won’t fully recreate that just-baked magic. Think “rescued and delicious,” not “time travel.”
Will this method work on gluten-free bread?
It can, but results vary more. Gluten-free breads often rely on different starches and gums, which respond differently to heat and moisture. Use less water, shorter times (15–25 seconds), and watch closely. You may find a sweet spot that makes your particular brand or recipe taste much better from frozen.
Can I add oil or butter to the pan for extra flavor?
You can, but add it sparingly and preferably after the initial steaming. Start with the steam-only method to revive the crumb, then finish with a few seconds in a lightly oiled or buttered pan (uncovered) to add a gentle toastiness. Too much fat too early can interfere with moisture absorption.
Is it safe to put frozen bread straight into a hot pan?
Yes. Bread has a low water content compared to something like frozen meat, so it won’t splatter dangerously. Just make sure you add your spoonful of water to an empty patch of pan, not directly onto the bread, to prevent any sudden sizzling against the bread’s surface.
How should I freeze bread to get the best results with this trick?
Freeze bread as soon as it’s clear you won’t finish it within a day or so. For loaves, slice before freezing and store slices in a freezer bag with as much air pressed out as possible. For rolls or chunks, wrap individually or in small groups. Less air exposure means less freezer burn and better texture when you bring them back to life in that magical thirty seconds on the stove.

Hello, I’m Mathew, and I write articles about useful Home Tricks: simple solutions, saving time and useful for every day.