The first thing you notice is the sound. That low, constant hum that has followed you for years suddenly goes quiet as you unplug the freezer. The kitchen falls into a kind of winter silence, and when you open the door, a bright puff of cold air brushes your face like a breath from a snow cave. Inside, glistening walls of frost cling to every surface—sparkling, stubborn, beautiful, and utterly impractical. You run a hand along the shelf and feel the hard, granular edges of ice. The peas are stuck, a bag of mystery leftovers has become part of the architecture, and your icebox looks more like a tiny polar landscape than a place to keep food. Somewhere, on a late‑night scroll or an overheard conversation, you remember it: the aluminum foil trick. The simple, silvery hack homeowners swear by. And suddenly, the chore feels less like drudgery and more like a small science experiment you’re about to run in your own kitchen.
The Hidden World Inside Your Freezer
Open the door and pause for a second. Let your eyes adjust to the little storm frozen in time on those shelves. Frost curling over the edge of a drawer. A slick, opaque layer of ice on the back wall. Freezers don’t just store food—they store stories. The frozen berries from last summer’s pick‑your‑own adventure. The emergency lasagna you were saving for a night when everything went wrong. The ice cream you swore you wouldn’t eat straight from the tub.
But that frost creeping along the sides? That’s not nostalgia—it’s science, and it’s costing you space and efficiency. Every time you open the door, warm, humid air rushes in, then cools and condenses on the cold surfaces. Droplets freeze. Over days and weeks, that thin film becomes crust, and that crust builds into thick, uneven ice. Your freezer works harder. Food stacks awkwardly. You start playing a risky game of “what’s behind this frozen wall?” only to realize your favorite dumplings are sealed in a sarcophagus of frost.
Defrosting, though, feels like a whole production—towels, bowls, endless waiting. Until you meet the quiet hero in your kitchen drawer: a roll of aluminum foil that will change the way you think about this chore.
The Sciencey Magic of Aluminum Foil
Pull out the roll and tear off a strip. It crinkles in your hand, catching the light, looking far too ordinary to be clever. But aluminum foil has two superpowers that matter in this icy little drama: it reflects heat and it conducts it very well.
When you press foil against a cold, icy surface, it acts like a fast lane for warmth from the room and the surrounding air. Instead of the ice slowly, stubbornly melting from just the front surface, heat can travel more evenly and quickly into it. At the same time, foil is thin and flexible, letting you mold it against shelves and walls like a silver second skin.
Then there’s the second act: once the ice is gone, foil can help slow its comeback. Acting as a smooth, less “grippy” surface than bare plastic or metal, it makes it harder for new frost to cling and build. Homeowners who swear by this method will tell you: not only does the aluminum trick help get the ice off faster, it makes your next defrost a much more distant problem.
Gathering Your Tools (and Your Patience)
Before you dive in, set the scene. You’re not going to be here for hours, but you also don’t want to be scrambling for towels while water drips across your tiles. Moving slowly now will let you move quickly later. Picture yourself standing in a pool of meltwater or prying at stubborn ice with a knife and you’ll know why a little prep is worth it.
Here’s a simple, at‑a‑glance list of what you’ll want nearby:
| Item | Purpose |
|---|---|
| Aluminum foil (heavy duty if possible) | To speed melting and line surfaces |
| Towels or absorbent cloths | To catch and soak up meltwater |
| Bowl or pan of warm (not boiling) water | Optional extra heat source |
| Plastic or wooden scraper/spatula | To gently slide off loosened ice |
| Cooler or insulated bag | Temporary home for your frozen food |
Lay a thick towel on the floor just under the freezer door like you’re tucking it in for a nap. This will catch the melt. If your freezer has removable drawers or shelves, slide them out to give you more room—and to let them warm up a bit on the counter while you work.
Step Into the Cold: Using Foil to Remove Ice Fast
Now you’re ready for the moment of truth: actually getting that ice out without an hour of chipping, hacking, and scolding yourself for waiting this long.
Step 1: Power Down and Empty Out
Unplug the freezer or switch it off if it has its own control. This isn’t a job you want to do while coils are still trying to keep things Arctic. Then, move your food into a cooler or insulated bag. It won’t be out for long, and most foods can handle a short stint in the slightly-warmer wild.
As the air inside begins to relax away from sub‑zero, the ice is already starting to loosen its grip. You’re just going to help it along.
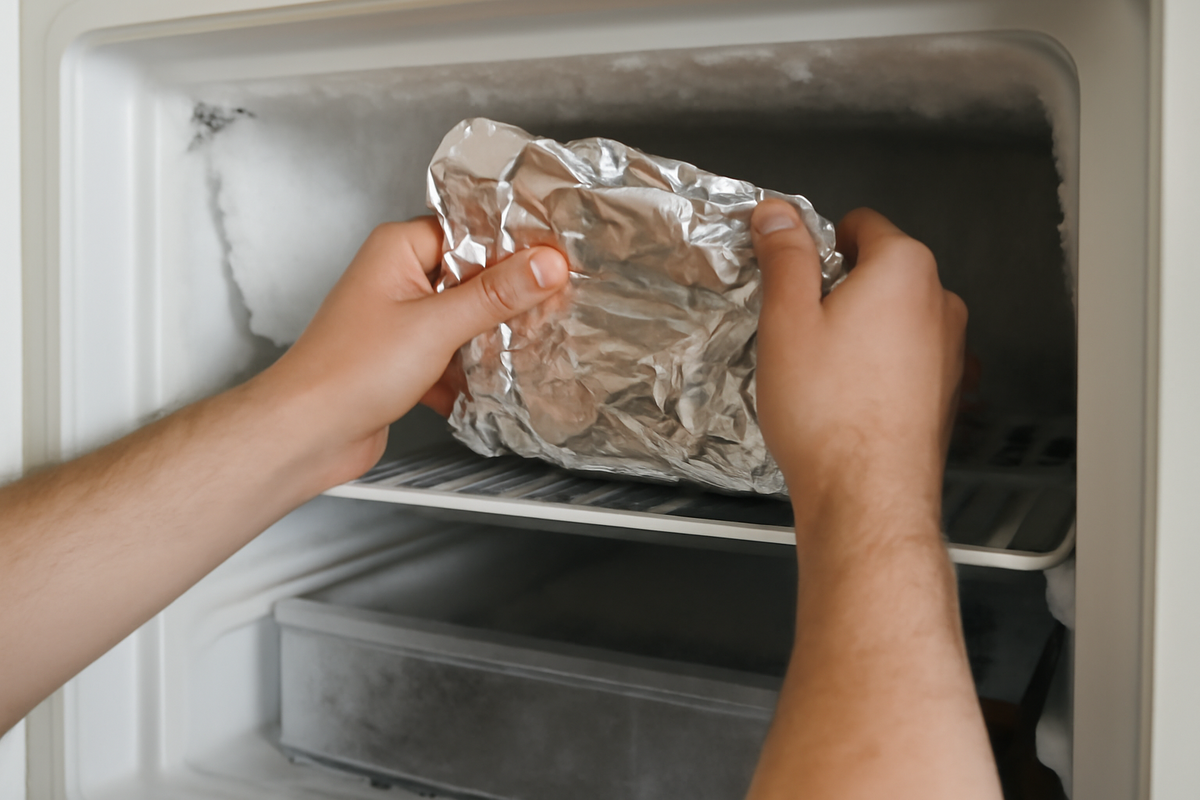
Step 2: The Foil Press
Rip off a sheet of aluminum foil long enough to cover a good portion of the icy area. Press it directly against the ice—on the back wall, the ceiling of the freezer, or the floor. Use your hands to mold it tightly into the contours, smoothing out big air gaps. It should feel like wrapping a gift in reverse, the gift in this case being a slab of ice you’re hoping to evict.
If the room is cool, or you want an extra push, you can warm your hands first under the tap and then press through the foil. The warmth travels through much faster than you’d expect. You’ll feel, after a minute or two, the top layers of ice turning from hard glass to something almost waxy and soft.
Step 3: Warm Water, Smarter Not Hotter
Next comes a gentle heat assist. Fill a shallow pan or bowl with warm water—the kind you’d happily put your hand into. You’re not trying to shock the freezer walls, just softly persuade the ice.
Place the pan on the bottom shelf or a flat surface inside the freezer with the door closed, letting the warm air swirl. The metal of the foil will pick up that lingering warmth and deliver it to the ice from multiple angles. It’s like leaving a tiny indoor weather system in there: a short, mild thaw creating just enough instability for the ice to surrender.
Check after five to ten minutes. You’ll see beads of moisture forming on the foil, and when you gently lift a corner, sections of ice may already pull away in dull, cloudy sheets.
Step 4: The Satisfying Slide
Once the ice starts to loosen, bring in your scraper. Not a knife, not a sharp metal tool—those are the villains in every scratched‑freezer horror story. Use a plastic spatula, a wooden spoon, or a purpose‑made plastic scraper. Slip it under the edge of a foiled area and coax the whole piece off in one gratifying move.
Sometimes, a whole plate of ice will slide away with a soft crackle, landing gently on the towel below. Sometimes it shatters, like breaking thin lake ice with a stick. Either way, it’s unexpectedly satisfying. The foil, now freed, can be peeled off and reused on another area until it’s too crumpled to cling well.
Work section by section: press on foil, let it sit for a few minutes with the warm water fogging gently below, then scrape and lift. You’re not chiseling; you’re persuading. The job that used to take an hour of frustrated scraping now compresses into a quick, almost rhythmic routine.
Line, Reset, and Keep the Frost at Bay
When the last chunk of ice has been carried to the sink or the tub, you’ll see your freezer naked for the first time in months—bare walls, smooth shelves, corners you forgot existed. This is the moment many homeowners swear by the second part of the aluminum foil trick: prevention.
Foil as a Future‑You Favor
Take fresh sheets of foil and line key areas: the flat floor of the freezer, the tops of shelves, perhaps the back wall if it’s not covered by vents or coils. Smooth it down firmly, but don’t tape it over any drainage channels or vents. The idea is to create a disposable, slippery skin that ice finds inconvenient to grip.
That thin frost that would have fused itself to bare plastic will now form on the foil. Next time you see it building up, instead of committing to a full defrost, you can peel off a section of foil, take the frost with it, and replace it in minutes. And when you do have to fully defrost again, the ice will generally release faster from foil than from hard plastic or painted metal.
Dry, Plug, and Refill
Before you turn the freezer back on, wipe every surface dry. Any leftover droplets turn into starting points for new frost. Pull the towel from the floor, wring it out, and feel the slight warmth of the room reclaiming the space where winter just ruled.
Plug the freezer back in and give it a few minutes to begin its steady hum. Then return your food—organized, maybe, as a little promise to yourself. Frozen fruit together, leftovers in one corner, ice cream given a proud spot where it won’t be forgotten behind a drift of frost.
The Quiet Rewards of a Clear Freezer
A freshly defrosted freezer has a different sound to it. The fan isn’t straining to push cold through thick layers of ice. There’s a little more room, the shelves feel taller, the drawers slide freely. You find things quickly. You stop playing that dangerous long‑term lottery of “how old is this really?” because you can see your food clearly again.
Efficiency improves too. Without ice acting as an insulating blanket over coils and surfaces, the freezer cools more evenly and uses less energy to do it. It’s subtle, but over time, your power bill and your appliance both breathe a tiny sigh of relief.
And there’s something else: a psychological lightness. Defrosting is one of those nagging tasks that lives rent‑free in the back of your mind. Turning it into a quick ritual with a roll of foil and a warm bowl of water reframes it. It becomes a short seasonal reset instead of a big, dreaded project.
Simple Habits to Keep Ice from Taking Over Again
Once you’ve seen how fast you can clear the frost with foil, you might be tempted to just deal with it when it looks bad. But a few small habits make your freezer feel civilized for much longer:
- Close the door with intention: The longer it stays open, the more humid air rushes in. Decide what you’re grabbing before you open it.
- Cool food before freezing: Putting warm leftovers straight into the freezer adds steam, which becomes frost.
- Check the seal: A cracked or loose seal leaks moist air, and that means more ice.
- Do mini‑defrosts: When you notice thin frosting on the foil lining, peel and replace that section before it becomes a glacier.
These are small, quiet choices, but they keep that polished, frost‑free feeling going much longer, making the full aluminum foil operation an occasional, almost meditative task instead of a yearly emergency.
FAQ: Fast Freezer Defrosting with Aluminum Foil
Is it safe to use aluminum foil inside my freezer?
Yes, aluminum foil is safe to use in a freezer as long as you don’t cover vents, fans, or drainage holes, and you avoid pressing it directly against exposed electrical parts. Use it only on smooth interior surfaces, shelves, and drawers.
Can I pour boiling water into my freezer to melt ice faster?
It’s not recommended. Sudden extreme temperature changes can crack plastic interiors or damage components. Use warm water—comfortable to the touch—along with foil, which speeds melting without shocking the materials.
How long does the aluminum foil method usually take?
Most small to medium freezers can be cleared in about 20–40 minutes using foil and warm water, compared with an hour or more if you just unplug and wait. The exact time depends on how thick the ice is.
Do I need heavy‑duty foil, or will regular foil work?
Regular foil works fine for most freezers. Heavy‑duty foil is more durable and holds its shape better, which can be helpful if you’re dealing with very uneven surfaces or plan to leave it in place as a long‑term liner.
Will lining my freezer with foil reduce frost completely?
It won’t eliminate frost entirely, but it can significantly slow buildup and make it much easier to remove. Frost is still likely to appear over time, especially if the door is opened frequently or the seal isn’t perfect.
Can I use a hair dryer along with the foil method?
You can, but only with caution. Keep the dryer at a safe distance, use a low or medium setting, and never let water pool near the cord or outlet. Many people find foil plus a bowl of warm water works well enough without adding electrical devices to the mix.
How often should I defrost my freezer?
For most manual‑defrost freezers, every 6–12 months is typical, or whenever frost reaches about 5–10 millimeters thick. With foil lining and good habits, you might stretch it longer or do quicker mini‑defrosts instead of big ones.
Can I reuse the foil after defrosting?
If the foil is only slightly wrinkled and still presses smoothly against surfaces, you can reuse it for another round during the same defrost or even leave it lined in the freezer. If it’s torn, heavily crumpled, or dirty, it’s better to replace it.
Is it okay to chip at ice with a knife if I’m careful?
It’s risky. Knives and other sharp metal tools can puncture the inner walls, damage cooling lines, or scratch surfaces, leading to serious and sometimes irreparable damage. A plastic scraper and foil‑assisted melting are much safer.
Why does my freezer ice up so quickly in the first place?
Common reasons include frequent door opening, warm food going in, a worn door seal letting in humid air, or a temperature set too low. Addressing these issues, plus using foil liners, will keep ice from reclaiming your freezer too quickly.

Hello, I’m Mathew, and I write articles about useful Home Tricks: simple solutions, saving time and useful for every day.