The trick, the old plumber told me, is not to let the boiler know you’re scared. He was kneeling on a hallway carpet, one hand on an ancient brass radiator valve that looked like it had survived three prime ministers and a house fire. “You can change this,” he said, “without draining the whole system. But you’ve got to respect the water, and you’ve got to work like you mean it.”
Radiators tend to live quietly along our walls, humming with heat in winter and collecting dust in summer, until one day a valve seizes, leaks, or simply gives up with a telltale drip that stains the carpet and your mood. That’s when most people imagine a full-scale plumbing apocalypse: drain down the whole system, bleed every radiator, refill, repressurise, then hope nothing else starts leaking afterward.
But there’s a lesser-known path—one that many pros casually do on site but rarely talk about in detail. You can change a radiator valve without draining the whole system. It’s a bit like open-heart surgery on your heating: controlled, precise, and slightly nerve-racking, but utterly doable if you’re prepared and you don’t rush.
The quiet secret of “freezing” and isolating
Before touching a spanner, it helps to understand why you don’t actually have to empty all that water hiding in the pipes. A central heating system is, by nature, closed and pressurised (if you’ve got a combi or sealed system) or gently gravity-fed (if you’ve got an older open-vented system). Either way, the water only wants to move if you give it a reason.
Pros use two main tricks: isolation and freezing.
Isolation is the polite way: you shut off the flow of water feeding the radiator, and you convince the rest of the system to sit quietly while you work. That usually means turning off the boiler, closing valves, and relying on the fact that water doesn’t flow uphill on its own.
Freezing, on the other hand, feels like cheating. With a special pipe-freezing kit—a cold sleeve clamped around the pipe and filled with a freezing agent—you literally turn the water inside the pipe into a plug of ice. That ice plug seals the system temporarily, so you can safely remove the valve without turning your house into an indoor fountain. Plumbers do this in lofts and kitchens all the time; it’s just not the sort of thing that makes it into glossy instruction leaflets.
You don’t have to use a freezing kit; in many cases you can rely on gravity, valves, and speed. But understanding that the goal is not “no water at all” but “controlled, predictable water” changes how you approach the whole job. A few drips are fine. A gentle trickle into a tray is fine. A gushing jet is not. The art is in keeping things in that first category.
Knowing your radiator: what you’re actually looking at
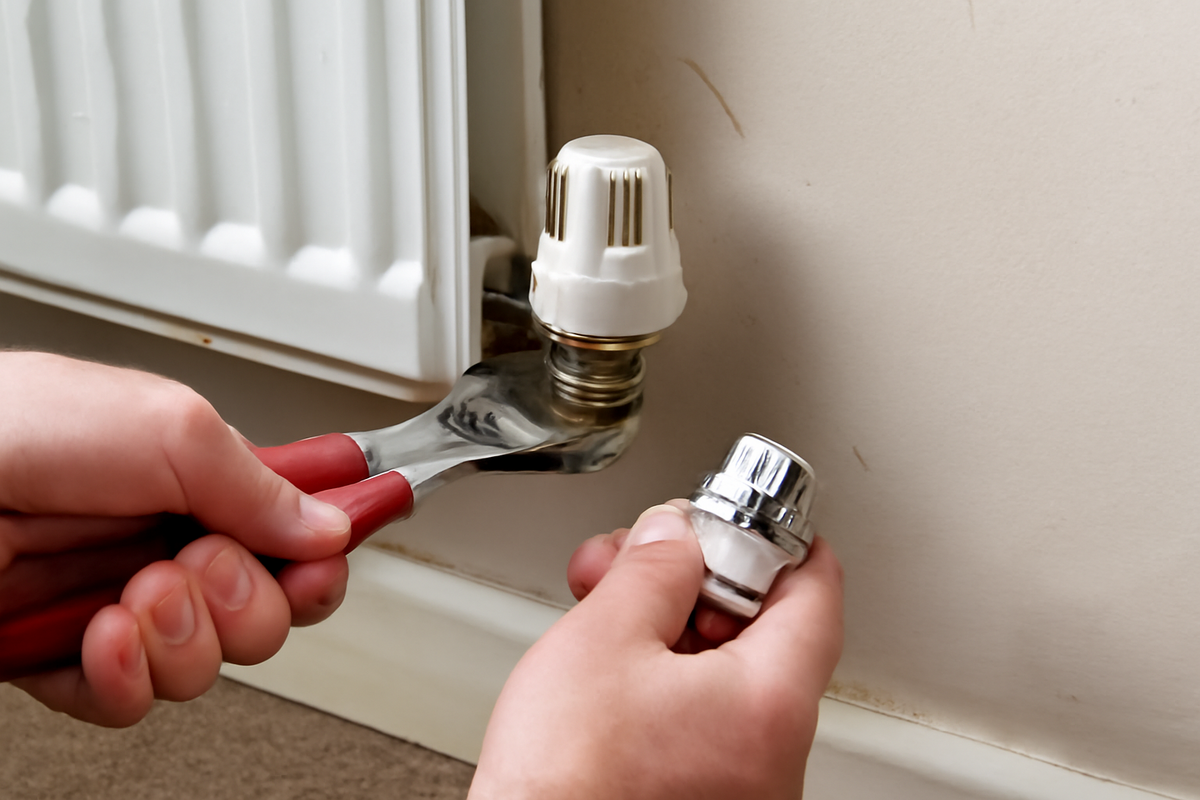
Walk over to your radiator. Run your fingers along the metal, feel the flecks of old paint, the dust caught like cobwebs in the fins. Then drop your hand to the valve—the small, often slightly wobbly bit at the bottom corner where pipe meets radiator.
On one side, you’ll probably see a thermostatic radiator valve (TRV) or a manual valve. This is the control side: the thing you twist to turn the radiator hotter or colder. On the opposite side, the quieter, more stubborn companion is the lockshield valve. That one is usually hidden under a plastic cap and is set with a small spanner or screwdriver when the heating is balanced. Both sides contribute to how the radiator behaves, but it’s usually the TRV or manual valve that people need to replace when they stick, leak, or refuse to shut off.
Each of these valves has two key connections: one into the radiator body and one onto the copper or plastic pipe coming out of the floor or wall. Those joints are sealed with olives (small copper or brass rings) and compression nuts—simple, reliable, and surprisingly forgiving as long as you don’t overtighten them.
Get low to the floor and you might also notice the bleed screw at the top of the radiator, a small square or slotted piece. That’s how you release trapped air, but it’s also your secret pressure-release point when you’re preparing to change a valve without draining the entire system. All these parts together form a little ecosystem of heat and pressure. Once you see it clearly, the idea of swapping a valve without emptying the whole network of pipes feels less like wizardry and more like careful timing.
Tools and bits you’ll want at your side
Gather everything before you start. Once the water is moving, you do not want to discover that the one thing you’re missing is in the shed, under a spider, on the far side of the garden.
| Item | Why You Need It |
|---|---|
| Adjustable spanners (2) | To grip both the valve body and compression nuts without twisting pipes. |
| Radiator bleed key or flat screwdriver | For releasing air and pressure and re-bleeding later. |
| New radiator valve (TRV or manual) | The replacement, matched to pipe size (usually 15mm) and radiator style. |
| PTFE tape | To seal threaded joints on the tail that screws into the radiator. |
| Towels and a shallow tray/baking tin | To catch and guide water; shallow fits under most radiators. |
| Pipe-freezing kit (optional) | To create an ice plug if you want extra security or have no isolation point. |
| Hex key or small spanner | For some lockshield caps and valve tails. |
You might also want a small torch or work light. The underside of a radiator on a winter afternoon is a world of shadows, and you don’t want to be guessing where the water is coming from.
Preparing the system: slowing the river before you step in
A calm system is your friend. The first thing you do is turn the boiler off and leave it for a while—20 to 30 minutes usually does it. You want the water to cool so that if it does spill, it’s just an inconvenience, not a scalding hazard.
Next, shut off the radiator you’re working on. Turn the TRV or manual valve to zero or off. On the other side, pop off the little plastic cap on the lockshield and turn the square or slotted spindle gently clockwise until it stops. Count the turns as you go—one, two, maybe three—so that when you’re done later, you can open it back to exactly where it was. That keeps your system’s balancing intact, and other radiators won’t sulk because you’ve messed with the flow.
If you’re working on an upstairs radiator in a sealed system, you’ve now effectively trapped a small volume of water between two closed doors. That’s what you want. If you’re nervous, this is the moment when a pipe-freezing kit can give you extra confidence: clamp it on the vertical pipe below the valve, create that ice plug, and know the water is literally frozen in place.
Slide your shallow tray under the valve and layer towels around it like a soft, absorbent moat. Then go to the top of the radiator and crack the bleed screw gently until you hear a soft hiss of air. This tiny gesture does two things: it releases any pressure in that radiator and tells you the system is now calm and ready. A droplet or two might form; wipe it away. This is not the dramatic part yet. This is just you listening to the system breathe out.
The moment of commitment: loosening the old valve
Back at the valve, take your two adjustable spanners. One holds the valve body steady; the other turns the nut that grips the pipe or the radiator tail. Always counter-hold: if you simply wrench one piece, you’ll twist pipes or stress joints hidden behind plaster and floorboards. Imagine you’re easing apart two stubborn friends in a narrow doorway, one hand on each, guiding, not yanking.
Start with the nut on the pipe side. A small, deliberate turn anticlockwise, and you’ll feel it give. As it loosens, a thin ring of water will appear, bead along the edge, and begin to drip into your tray. Let it. This is the water in the radiator finding its way out, not the entire system revolting. If you’ve isolated properly, the flow should slow quickly to a steady drip or trickle. You can slightly re-tighten if it feels too eager, then go to the nut that connects the valve to the radiator tail and loosen that too.
As both nuts relax, you’ll feel the valve begin to move freely. Now you’re holding a small metal gate in a very short stretch of canal. Tilt it gently away from the radiator, guiding water into the tray. If you’ve used a freezing kit, the flow will probably stop entirely after a brief release. If you haven’t, you may get a gentle continuation as gravity empties what’s in the radiator itself. There’s a rhythm to it: loosen a little, let it run, pause, adjust, breathe.
Once the valve is clear, you can slide it off the pipe and the radiator tail, keeping it upright to avoid spilling any water caught inside. Set it carefully on a towel. The opening in the radiator might still weep a bit, but nothing you can’t persuade into your waiting tray with a bit of gentle repositioning.
Fitting the new valve: precision in the quiet after the storm
With the old valve off, you’re at the most delicate part of the job—and paradoxically, the most peaceful. The system has surrendered its tension. Now it’s down to your hands and your patience.
Look at the radiator tail (the short piece that screws into the radiator itself). If your new valve came with its own tail, use it: they’re often matched to the valve internals for a better seal. That means unscrewing the old tail from the radiator using a hex key or radiator tail tool, wrapping the threads of the new one with several neat turns of PTFE tape in the same direction that you will screw it in, and tightening it firmly but not brutally back into the radiator.
Inspect the olives on the pipe side. If they’re clean, not crushed, and match the new valve nicely, you can often reuse them. If they’re scarred or the new valve doesn’t seat well, cut them off carefully and fit new ones. Olives are tiny, but they carry a lot of responsibility; a misshapen one is a slow leak waiting for a quiet evening to betray you.
Now slide the compression nuts onto the pipe and tail if you removed them, then offer up the new valve, aligning it so the thermostat head or manual knob will sit neatly when everything is tightened. Thread the nuts onto the valve body by hand first—never force metal against metal with tools until the threads have found their own way.
With your spanners again working in opposition, tighten each nut slowly. There’s a feel to compression fittings: resistance, then a subtle give as the olive bites and seals, then a firm stop. You don’t need to lean your whole weight into it. Over-tightening can be as bad as under-tightening, crushing olives and distorting threads. Think firm handshake, not bone-crushing grip.
Bringing the system back to life
Everything is now in place; it’s time to reverse the quiet you created earlier. First, close the bleed screw at the top of the radiator if you left it slightly open. Then go to the lockshield side and open it by the same number of turns you counted when you shut it. That restores the flow setting that kept your system balanced.
On the new control valve, set it to fully open. This invites water back into the radiator once the system is pressurised again. If you used a pipe-freezing kit, follow its instructions to let the ice plug thaw slowly; never apply heat directly to a frozen pipe. It will melt on its own, and you’ll hear the faint gurgle and whisper of water moving through once more.
Turn the boiler back on and let the system come up to pressure and temperature. As it runs, go back to your radiator with the bleed key again. Crack the bleed screw open until you hear that familiar hiss, then a sputter of water as air escapes. Hold a cloth beneath it to catch droplets. Once a steady stream of water appears, close it. Feel the radiator gradually warming, top to bottom, side to side, like a metal animal shrugging off sleep.
Now watch. This is the part many people rush, but it’s where you confirm your success. Look closely at the joints around the new valve: the pipe nut, the radiator tail nut, the body of the valve itself. A tiny weep will show up as a pearled droplet, a darkening ring, a shy shine. If you see one, nip the nut a quarter turn tighter and watch again. Most small leaks surrender to that kind of gentle persuasion.
Why pros keep this close to their chest
You might wonder why a method like this isn’t shouted from every DIY rooftop. In truth, many professionals do this daily: isolating, swapping valves, freezing pipes, keeping systems intact while they work with speed and familiarity. But there’s a fine line between a useful shortcut and a liability when explained without nuance.
Change a valve without understanding system type, without proper isolation, or with a rusty old pipe that’s dying to crack, and you can quickly go from “clever hack” to “call the emergency plumber and fetch more buckets.” It’s not that the technique is unsafe—it’s that it depends on respect. Respect for water pressure, for old fittings, for the limits of your own comfort with tools.
Yet there’s something deeply satisfying in doing it right. You save time, yes, and you avoid draining and refilling a system that didn’t ask to be emptied. But more than that, you build a new, almost conversational relationship with your heating. You stop seeing it as a mysterious tangle of pipes and start recognising it as a system you can understand, influence, and maintain.
That old plumber in the hallway finished tightening a new valve, wiped his hands on a towel, and listened. The radiator ticked as it warmed, the faintest scent of hot dust rising into the air. “There,” he said. “Didn’t need to drain a thing. Just needed to listen to what the water wanted to do—and stay one step ahead of it.”
FAQ
Can I really change a radiator valve without draining the whole system?
Yes, you can on most systems, as long as you isolate the radiator properly (by closing both valves) and manage the small amount of water in that radiator. A pipe-freezing kit can add extra safety, but many pros work without one using gravity and speed.
Is this safe for a complete beginner?
It’s manageable for a careful DIYer with basic tool confidence. If you’re nervous about leaks or dealing with very old, corroded pipework, it may be wiser to watch a professional first or at least start on a radiator in a less critical room.
How do I know if I have a sealed or open-vented system?
A sealed system usually has a pressure gauge on or near the boiler and a filling loop. An open-vented system typically has a small feed-and-expansion tank in the loft. Either type can allow valve changes without full draining, but sealed systems make isolation more predictable.
Will I lose a lot of water doing this?
No. You’ll mostly lose the water that’s inside that one radiator and a short section of pipe. With good isolation and a tray in place, it’s usually no more than a shallow panful.
Do I have to rebalance the heating after changing the valve?
If you return the lockshield valve to the same number of turns open as before, the system balance should remain very close to how it was. If some radiators later feel much hotter or cooler than others, you can fine-tune balancing, but often it isn’t necessary.
What if the new valve still leaks a little?
First, try tightening the compression nuts gently by a small amount. If that doesn’t work, the olive may be damaged or the threads dirty. In that case, you may need to isolate again, remake the joint with a new olive, and ensure everything is clean and aligned.
Is a pipe-freezing kit worth it for a one-off job?
If you’re anxious about isolation or your valves don’t fully close, a freezing kit can make the job feel much calmer. For a single valve change, it’s not essential but can be reassuring—especially on live pipes with no easy shut-off point.
How long should the whole job take?
For a first-timer working carefully, expect around one to two hours, including cooling the system, preparation, swapping the valve, and bleeding and checking afterward.

Hello, I’m Mathew, and I write articles about useful Home Tricks: simple solutions, saving time and useful for every day.