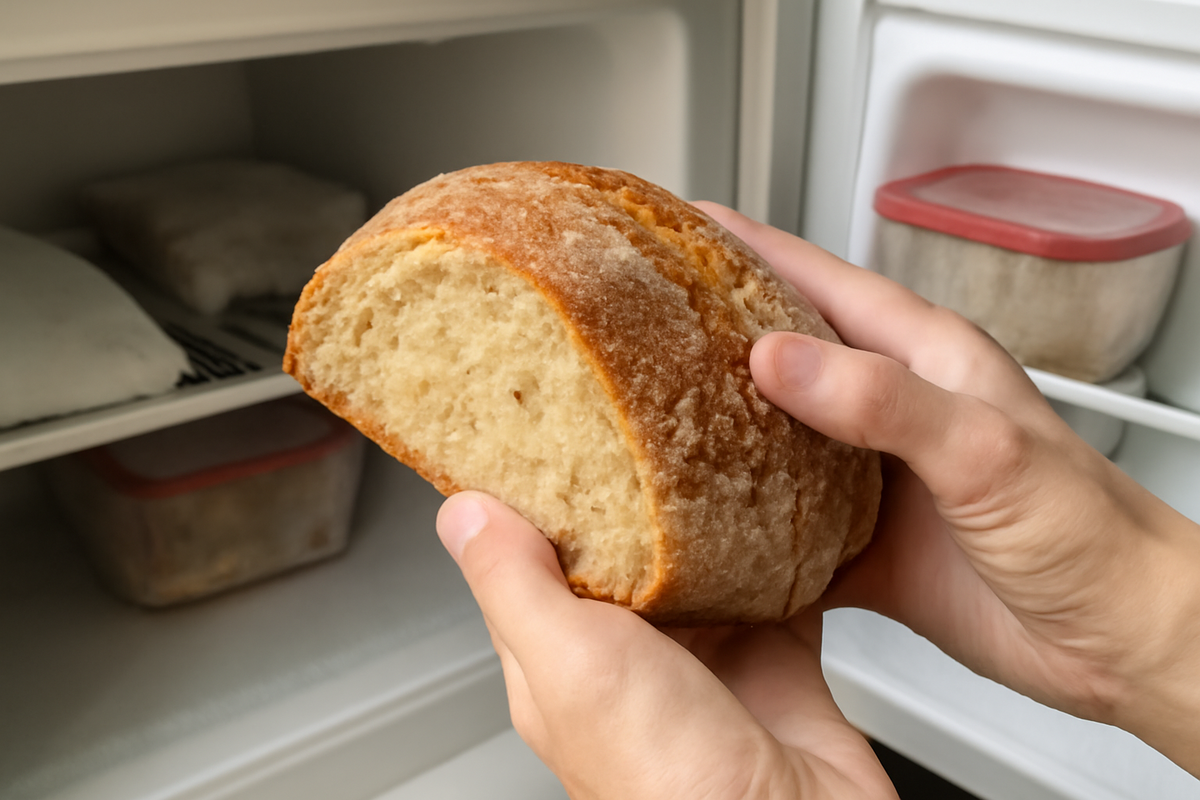
The first time I pulled a naked loaf of bread straight from the freezer and slid it into the oven—no bag, no foil, no careful wrapping—I felt like I was committing a culinary crime. The crust was frosted white, the inside a dense, icy brick. Everything I’d ever been told about freezing bread screamed in protest. And yet, twenty minutes later, when I eased that loaf onto a wooden board, the kitchen filled with the sound of crisp crust crackling back to life. The knife met resistance, then yielded with a shattering whisper. Inside, steam unfurled. The crumb was soft again, fragrant, almost as if it had just left the bakery an hour ago. I stared, half delighted, half suspicious. How could something that went into the freezer naked come out tasting reborn?
The Quiet Science Behind a Naked Loaf
Freezing bread has always sounded like a compromise: a way to delay staleness, never to preserve the magic. We’ve been taught to swaddle our loaves in layers—plastic bags, foil armor—as if air itself were the enemy. But under all that wrapping, something slow and silent keeps happening.
As bread sits, even at room temperature, its starches crystallize. What was once springy and pillowy grows firm, then dry. The freezer slows this process almost to a halt, but it doesn’t reverse it. That’s where heat comes in. Real, radiant, unapologetic heat.
When you place a frozen loaf directly into a hot oven with nothing between crust and air, you’re doing two things at once. The inside gently thaws, the ice within the crumb turning to steam. The crust, exposed and unprotected, wakes first. It dries, it sizzles, it deepens in color. That contrast between sharp, crackling exterior and plush interior is exactly what makes fresh bread so irresistible. The bag, the foil, the protective layers—those things trap moisture against the crust, softening it into submission. The bag-free, foil-free method trusts the oven and the bread to sort it out between themselves.
There’s comfort in that trust. It feels almost old-fashioned, like hanging laundry in the wind instead of sealing it in a machine. The loaf is simply itself: flour, water, salt, yeast, and time—frozen, then thawed in a blaze of dry heat. No plastic sheen, no crinkling aluminum. Just bread and fire, as primal as it comes.
How to Freeze Bread Like You Actually Love It
This trick begins long before the oven door swings open. It starts the moment you decide your bread deserves a longer life than a day on the counter. Picture that just-bought sourdough: the crust still sings if you press it gently. Or maybe it’s the nutty whole-wheat boule you pulled from your own oven that morning, the one that made your kitchen smell like a small rural bakery.
Let it cool completely first. Trapping residual warmth inside a freezer is like bottling up a storm. Steam condenses, ice forms on the surface, and even the most faithful oven can struggle to crisp things up again. Once the loaf is cool, you have two choices, depending on the kind of bread person you are.
The Whole-Loaf Devotee
If you love the ritual of breaking into a full loaf, freeze it intact. Place the bare loaf on a plate or directly on a freezer-safe shelf, giving it a little room on all sides. Let it firm up uncovered for a couple of hours. Once the surface is frozen and no longer tacky, you can leave it as is, or, if you must, slip it into a simple paper bag to keep crumbs from wandering. No plastic, no tight seals. You’re not trying to build a fortress—just give it a quiet place to rest.
The Slice-at-a-Time Forager
Maybe your mornings are built on toast and your afternoons on grilled cheese. In that case, slice the bread before freezing. Lay the slices slightly overlapping on a tray, let them freeze solid, and then bundle them loosely in a paper bag or stack them neatly in a shallow container with a bit of space so they don’t weld together.
Here’s the unexpected part: even when frozen in slices, you still don’t need foil or plastic cocoons. A dry surface is your friend. What you trade in ultra-long storage time, you gain back in texture. Slices frozen this way, and revived in a hot oven or toaster, reclaim that elusive combination of crisp edge and tender center instead of rubbery middles and limp crusts.
Bringing Bread Back to Life: The Oven Ritual
The real magic happens when that cold, rigid loaf meets heat again. This is where the bag-free, foil-free part really proves its worth. You don’t need to thaw the bread first. In fact, skipping the thaw often gives better results. No condensation, no soggy crust. Just a clean transition from ice to steam.
For Whole Loaves
Preheat your oven to somewhere between 180°C and 200°C (350°F to 400°F). There’s room for instinct here: a denser, darker loaf likes the higher end; a soft sandwich bread might be happier at the lower. Place the frozen loaf straight onto the oven rack or a preheated baking stone or tray. No tray lined with foil, no parchment cradling it like a delicate thing. Let the hot air circle it fully, front and back, top and bottom.
After about 15–20 minutes, your kitchen will start to smell like a bakery again. That scent is your first signal. When you lift the loaf out and tap its underside, it should sound hollow and confident. If it still thuds heavily, give it a few more minutes. Then, the hardest part: let it rest for about 5–10 minutes before cutting. Inside, the crumb is still settling, letting steam redistribute so your first slice isn’t a damp, steaming collapse.
For Slices and Smaller Pieces
Frozen slices can go straight into a 200°C (400°F) oven on a bare rack. In 5–10 minutes, they emerge as crisp-edged, soft-hearted carriers for butter, jam, or anything else your day calls for. Crusty rolls respond beautifully to the same treatment, especially if they went into the freezer at their prime. Garlic bread, bruschetta bases, and open-faced sandwiches all thrive under this approach.
You’ll notice something else: the crust doesn’t just come back; it changes slightly. It might become a shade deeper in color, the bubbles and ridges more defined. There’s a faint, satisfying crackle when you squeeze it, the sound people pay good money to hear in artisan bakeries. It’s as if the bread, given a second chance, wants to show off a little.
A Simple Table for Quick Reference
For those days when you want to skip the poetry and get straight to the bread, here’s a quick guide you can glance at on your phone while standing in front of a hot oven with a frozen loaf in hand.
| Bread Type | How to Freeze | How to Revive (No Bag, No Foil) | Approx. Time |
|---|---|---|---|
| Crusty sourdough loaf | Cool fully, freeze whole, uncovered on shelf or plate | Oven at 190–200°C; place loaf directly on rack | 15–25 minutes, then 5–10 minutes rest |
| Sandwich loaf | Cool, freeze whole or sliced; light paper wrap optional | Oven at 180–190°C; rack or tray, no cover | 12–20 minutes whole; 5–8 minutes slices |
| Artisan rolls / baguette pieces | Freeze loose, uncovered until firm | Oven at 200°C; place directly on rack | 8–12 minutes |
| Toast slices | Freeze in single layer, then stack loosely | Oven at 200°C or straight to toaster | 5–7 minutes oven; usual time in toaster |
Why Ditch the Bags and Foil at All?
There’s the texture, of course. When you remove the layers between the bread and the oven, you let the crust dry out again. The freezer may have dulled it, but the oven sharpens it. Without a barrier to trap steam, the liquid that forms as the bread warms doesn’t linger on the surface. It vanishes into the dry heat instead, leaving crispness behind.
But something else happens too: your kitchen becomes a little quieter. No more wrestling rolls out of cling film, no more peeling foil away and wondering whether it’s safe to reuse. Bread transforms from something you “store” to something you “put to sleep and wake up again.”
Then there’s the quieter, long-term gain: fewer bags, less foil, less throwaway worry. In the space where you used to keep crumpled plastic and a box of aluminum, maybe there’s now just a wooden bread board and a knife. The freezer itself looks calmer: loaves resting openly, like stones in a cold river, waiting for their turn by the fire.
Swapping out single-use habits for simpler ones can feel abstract, but this one is tangible. You hear it in the crackle of the crust. You taste it in the chew of the crumb. You see it when you open the freezer door and find, not stacks of wrapped relics, but familiar shapes that still look like bread instead of packages.
Moments Letting Bread Surprise You Again
Some changes in the kitchen happen so quietly you barely register them. This one doesn’t. You notice it the first busy weekday morning when you remember the forgotten loaf at the back of the freezer. You pull it out, stiff and frosted, and for a second you consider throwing it straight into the compost. But curiosity wins. Ten minutes of preheating, twenty of heat, and suddenly you’re slicing into something you’re proud to serve.
Or imagine a small winter evening with friends. Soup on the stove, something simple and comforting: lentils, tomatoes, a bay leaf drifting lazily in the pot. You realize you never bought fresh bread. The store is closed, the streets outside slick and dark. Then you remember the half baguette from last week. It goes straight into the oven, bare and brave. When it comes out, you tear it open and pass pieces around the table. No one knows they’re eating bread that, an hour ago, was an icy relic.
These small rescues add up. They’re not dramatic, but they are deeply human: finding a way to make what you already have not just acceptable, but quietly wonderful. Bread, of all things, deserves that kind of care. It has always been more than food; it’s a symbol tucked quietly into breakfasts and picnics and late-night snacks—a simple, sturdy presence at the center of so many days.
The bag-free, foil-free freezer trick doesn’t turn you into a professional baker. It doesn’t require secret ingredients. It just shifts your relationship with one of the most ordinary foods in your house. Instead of thinking of bread as fragile and short-lived, you begin to see it as something that can go through cold and return, arms open, ready to feed you again.
Questions You Might Still Be Asking
Does bread get freezer burn if I don’t wrap it?
Over a very long time, yes, it can. But for most home kitchens, where bread is eaten within a few weeks, a loaf frozen bare or in a light paper wrap does just fine. The surface might dry slightly, but that outer layer crisps beautifully in the oven. If you routinely freeze bread for months, you can still keep this method by limiting plastic and using a loose paper bag rather than airtight plastic.
Can I use this method for gluten-free bread?
Gluten-free breads tend to dry out more quickly, so time and temperature matter. Freeze them sliced, then revive at a slightly lower temperature, around 170–180°C (340–355°F), for a shorter time. You’ll still want to skip the foil or plastic, so the crust can regain some texture, but watch closely so the crumb doesn’t become overly dry.
What if my bread is already sliced and in a plastic bag from the store?
You can still adapt the trick. Freeze it as is if you like, but when it’s time to revive, remove the slices from the plastic and place them naked on a rack in a hot oven. The key moment is the reheating, when you let heat and air restore the crust. The plastic’s job can end at the freezer door.
Is it safe to put frozen bread straight into a hot oven?
Yes. Bread is already fully baked before it hits the freezer. You’re not cooking it again, just warming and drying it. As long as your oven-safe trays or racks can handle high heat, there’s no safety issue. Handling-wise, just be careful of steam when you cut into the loaf—give it a few minutes to settle.
Why does my revived bread sometimes feel dry inside?
If the crumb feels dry, it may have spent a bit too long in the oven, or your loaf might have been quite old before freezing. Next time, shave a few minutes off the reheating time, and consider freezing bread closer to its peak freshness. The oven can resurrect a lot, but it can’t restore moisture that’s long gone.
Can I use a toaster oven or air fryer instead of a full oven?
Absolutely. A toaster oven works well for small loaves and slices, and an air fryer can be surprisingly good for rolls and individual pieces. Use similar temperatures—around 180–200°C—and shorten the time, checking frequently. The principle stays the same: no bag, no foil, and enough dry heat to re-crisp the crust while softening the inside.
Will this work for sweet breads like brioche or cinnamon swirl?
Yes, but gently. Rich, sweet breads contain more sugar and fat, so they brown faster. Use a slightly lower temperature, around 170–180°C, and keep a close eye on them. The foil-free, bag-free revival will still give you that soft interior, with a delicately crisp surface, without suffocating them in steam.
In the end, this isn’t just a trick; it’s a small shift in trust. Trust the freezer to pause time. Trust the oven to wake what’s sleeping. And trust the bread itself—that ancient companion—to endure a bit of cold and return, once more, to warm, crackling life.

Hello, I’m Mathew, and I write articles about useful Home Tricks: simple solutions, saving time and useful for every day.